Indian Expeditionary Force "B" at Tanga, German East Africa, November 1914
Overview
In the early months of the Great War
Britain decided to send Indian Expeditionary Force ‘B’ (IEF ‘B’) across the
Indian Ocean to deliver a knock-out blow to the enemy forces in German East
Africa (GEA), now Tanzania. The
assumption was that British Indian Army troops were more than a match for the
German Askari that defended GEA. In the
event the reverse occurred and after two days of fighting the British
ignominiously withdrew, leaving masses of weapons, ammunitions and stores
behind in GEA, plus many soldiers dead or taken prisoner.
This defeat need not have happened as at
the end of the first day of combat the German troops had withdrawn, and Tanga
town could have been easily occupied and defended by IEF ‘B’. But a succession of incompetent decisions by
British Naval and Army officers had led to the demoralisation of some infantry
battalions and of support troops and porters working on the beaches; this
greatly influenced senior British officers who lost belief in victory. The British superiority in naval firepower
was never used effectively, but the German superiority in the number and
effectiveness of their machine guns was decisive. The Germans also had a commander who knew how
to fight a battle.
The British defeat was concealed from the
public and the blame was placed on the shoulders of the Indian Army sepoys
involved in the battle. That was an
unfair criticism. Some men ran away but
many stood and fought and took the battle to the Germans. Ross Anderson has written an excellent
account of the political background in Delhi and London and of the ineptitude
of British naval and army commanders, so this article concentrates on the
details of the fighting on the ground as experienced by the British units
involved.
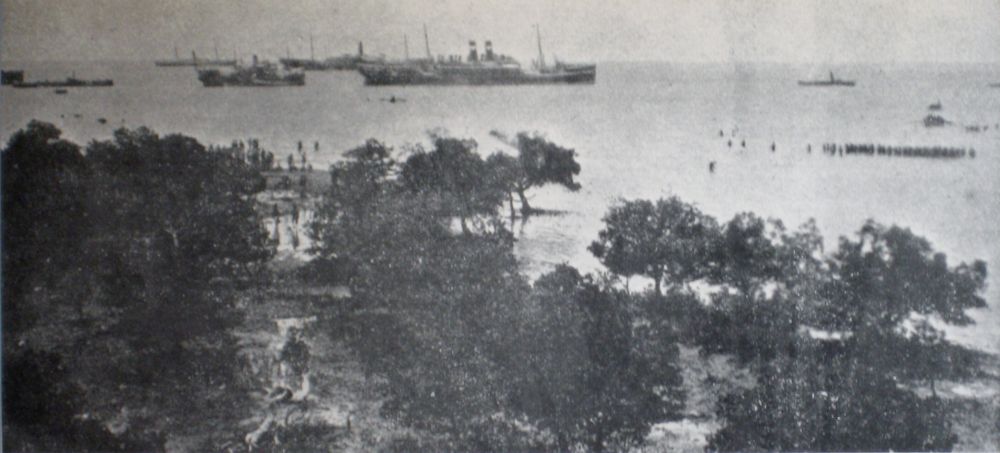
Above: A photo of the beach today, and one of the re-embarkation of sepoys at tanga
The
composition of Indian Expeditionary Force ‘B’
On the declaration of World War I the
government of India undertook to send two Expeditionary Forces to East Africa;
many thousands of Indian troops were also sent to France, Egypt, the Persian
Gulf and China so the African IEFs did not necessarily contain the best troops
in the Indian Army. The first East
African Force to arrive was IEF ‘C’ which provided defence for the Uganda
Railway that ran from Mombasa inland to Lake Victoria. The despatch of IEF ‘B’ was a much larger
operation designed to assist the Royal Navy by seizing the German port of Dar
Es Salaam; IEF ‘B’ was then expected to either isolate or defeat the German
local defence force named the Schutztruppe.
The mission of IEF ‘B’ was later changed to seize the smaller port of
Tanga which lay just south of the border between GEA and British East Africa
(BEA), now Kenya. IEF ‘B’ was then
expected to deal with the bulk of the Schutztruppe that was stationed in the
Moshi area, up a small railway line from Tanga.
British troops in BEA were to act aggressively against German forces
near Moshi to prevent the Tanga defences from being reinforced during the
landing of IEF ‘B’.
IEF ‘B’ was commanded by General A.E. Aitken
and it comprised Force Headquarters, two infantry brigades and a large number
of attached and Line of Communication troops.
The ration strength of the Force was 7,972 soldiers plus 2,550 Followers
and porters and 343 pack mules. Twelve
troopships were needed to transport the Force.
27th (Bangalore) Infantry
Brigade (Brigadier General R. Wapshare) contained:
§ 2nd
Loyal North Lancashire Regiment (the only British Army unit) § 63rd
Palamcottah Light Infantry § 98th
Infantry § 101st
Grenadiers
The Imperial Service Infantry Brigade
(Brigadier General M.J. Tighe) contained:
§ 13th
Rajputs (The Shekhawati Regiment) § 61st
(King George’s Own) Pioneers § 2nd
Kashmir Rifles § a
half battalion of 3rd Kashmir Rifles § a
half battalion of 3rd Gwalior Infantry
Attached troops
included: 28th Mountain Battery; an Armoured Train gun detachment
from the North Western Railway Volunteers; two Sappers & Miners Railway
Companies; one company of Faridkot Sappers & Miners; Field Ambulances; and
specialist engineer and signal troops.
Line of Communication troops
(Brigadier General W.A. Malleson) included: Hospitals and medical support
units; Post Offices; and engineer, ordnance, finance and labour units.
IEF ‘B’ contained a balance of teeth arm
and supporting troops but it was weak on artillery. The Indian battalions had been brought up to
mobilisation strength by the posting-in of drafts of sepoys from linked
units. Regrettably the Force was a
composite creation whose constituent parts had not worked with each other
operationally, and whose senior officers were totally unprepared mentally for
the shock of modern warfare. Many sepoys
were strangers to machine guns (1) and in fact the 63rd Palamcottahs
only received its allocation of two machine guns after it had boarded its
transport ship.
Most sepoys were suddenly issued with the
short Lee-Enfield rifle just before embarkation and they were unfamiliar with
the sighting and mechanism systems; the Imperial Service units did not have
machine guns, pistols or telephones. Some
units had new European officers posted-in who were unknown to the sepoys, and
many sepoys had not travelled by sea before.
Very few of the officers and men in the Force had recent operational
experience. The sea voyage itself
unsettled many sepoys especially when difficulties were experienced in
providing suitable ethnic food from the transport ships’ galleys.
Spalte 2
The
German Schutztruppe
The Schutztruppe was commanded by Colonel
Paul von Lettow-Vorbeck, a tactically sound and vigorous leader who had
experienced tough operational activity in China and German South West Africa, now
Namibia. On the outbreak of war the GEA
Schutztruppe consisted of 14 Field Companies that were dotted around the
massive colony on internal security duties.
Each company had around 180 African Askari and 20 European officers and
Non-commissioned Officers. The force was
strong in machine guns, some companies possessing four guns; all the guns were
fired by Europeans. But half of the
Askari still used 1871-pattern black-powder rifles that produced dense smoke
clouds when fired in volleys, as the Schutztruppe’s rifle modernisation
programme had been interrupted by the declaration of war.
By November a large Askari expansion
programme was underway and hundreds of German, Austrian and Hungarian civilians
had been mobilised, many into all-European companies. The Askari were recruited from warlike tribes
and most had recent experience of internal security operations. Since war had been declared Von Lettow had
been using his troops on cross-border raids into British territory. In early November 1914 the coastal area near Tanga
was defended by four field companies and a European company, all under the
command of Captain Paul Baumstark.
Approaching
Tanga
IEF ‘B’ left Bombay on 16th
October 1914, meeting up with ships from Karachi two days later. Escorted by the battleship HMS Goliath that was armed with four 12-inch
guns the Force anchored below the horizon off Mombasa on 30th
October. At a conference in the port on
the following day the navy announced that it had made a truce, not ratified by
London, and that the German authorities in Tanga should be advised that the
truce was cancelled before hostilities commenced. This destroyed the element of surprise that
General Aitken had planned on but he meekly acquiesced to the naval officers
present. Additionally HMS Goliath broke down off Mombasa, but as
minimal German opposition was expected the decision was made to carry on with
the operation without Goliath, and during
the evening of 1st November the convoy approached Tanga Harbour.
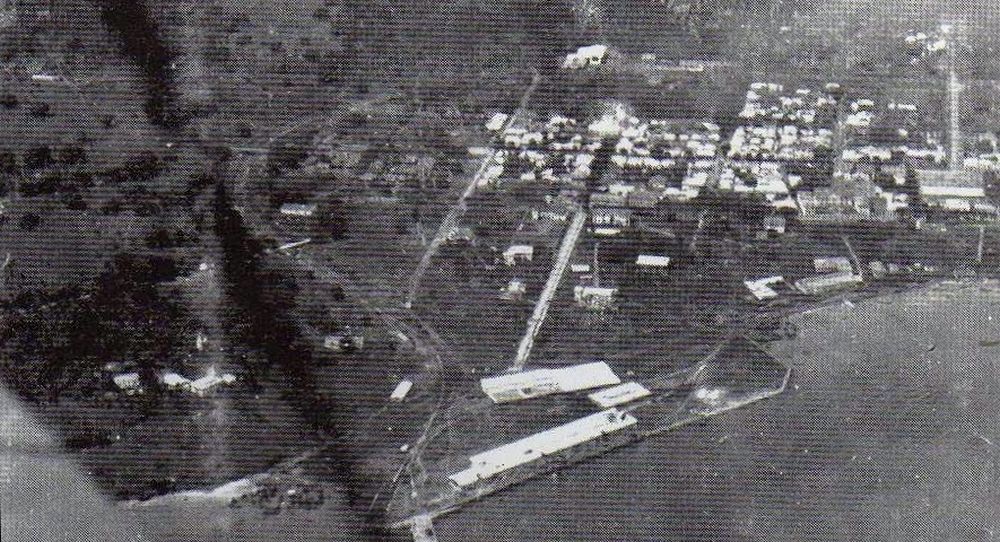
Above: Tanga Great War aerial photo
To quote from the Official History:
“For the Indian
troops the voyage was a misery. Unused
to the sea, and in some cases without their usual food, they suffered
considerably from sea-sickness on the days when a slight swell marred otherwise
good weather. Their ships were small and
crowded, with so little deck space that even physical training was only
possible for a few squads at a time.
Efforts were made to keep the men fit, and to carry out such military
training as was possible; but as the convoy neared the Line the great heat
below decks and the general discomfort became intensified. There can be no doubt that the fortnight’s (2)
voyage under such conditions told heavily on the whole force, both morally and
physically, and was at least a predisposing cause of the failure which was to
come.”
Initial
landings
The first men ashore were two uniformed intelligence
officers, Major A. Russell and Lieutenant H.P. Ishmael (3). They landed at 2100 hours on 1st
November near a prominent building known as the Red House and went separate
ways to gain information. Ishmael went
towards the German hospital and was soon seen by an enemy sentry and shot; he
died in the hospital shortly afterwards.
Russell avoided contact and collected information from African
civilians; he re-embarked as planned having waited an hour for Ishmael.
During the 2nd November a naval
farce ensued as the Germans in Tanga were informed of the cancellation of the
truce and invited to surrender; the invitation was declined and the German
commander mobilised effectively and requested reinforcements from Moshi. Meanwhile the Royal Navy, concerned about the
threat of mines, searched for and swept channels for safe access to Tanga
Harbour. Eventually the plan to land
troops in the harbour was abandoned and and a beach was selected on the
headland of Ras Kasone.
As the sun began to set disembarkation of the
13th Rajputs began on Beach ‘A’ which was near the Red House,
followed by the landing of four companies of the 61st Pioneers; the
sepoys had to walk through chest-high water to reach the beach. These landings were completed by 0230 hours
and a defensive line was established.
German patrol activity was minimal and was dispersed by two rounds of
fire from HMS Fox’s 6-inch and
4.7-inch guns. The scouts of the
Imperial Service Brigade (IS Brigade), under Lieutenant J. Ferguson, moved
forward and spotted enemy machine guns on the road whilst a Rajput patrol under
Captain C.R.F. Seymour observed machine guns along the railway cutting facing
them but the report of these weapons does not appear to have been taken
seriously by Brigade Headquarters.
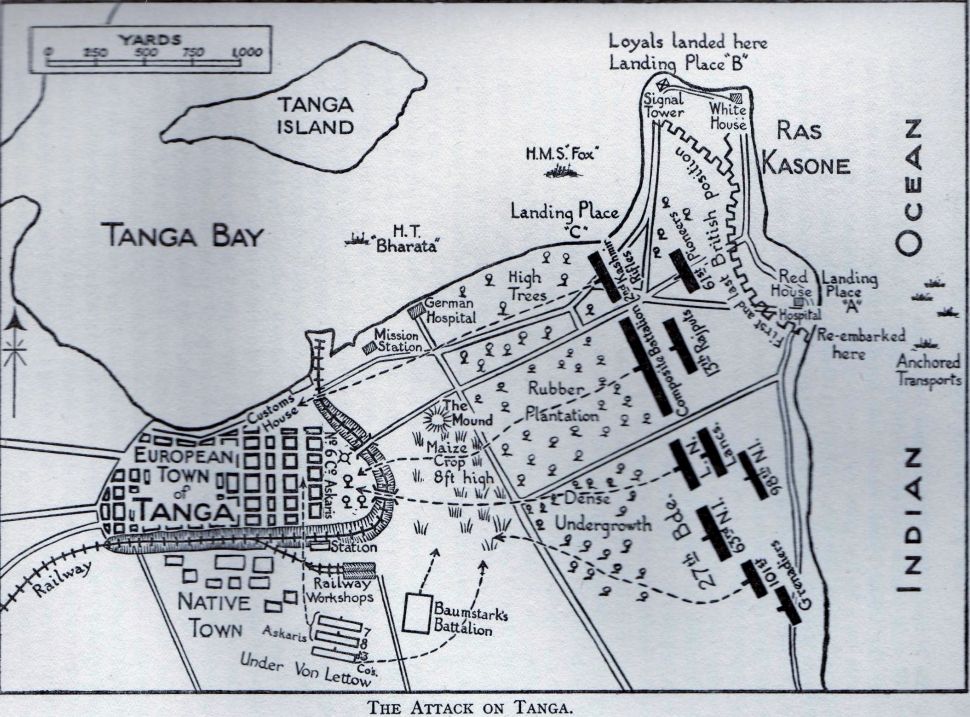
Above: Tanga Battle Map (from Wylly)
The
first advance on Tanga on 3rd November
At 0430 hours on 3rd November
half of the 13th Rajputs advanced as a vanguard with two machine
guns along a road towards Tanga town; Lieutenant Colonel J.A. Stewart commanded
the vanguard. On either side of the road
were plantations, clumps of trees and bush and farmers’ fields. On the outskirts of the town a semi-circular
and deep railway cutting faced the Rajputs, and the German 17th
Field Company defended the cutting from the town side. The Germans allowed the Rajputs to approach
the cutting before opening machine gun fire; the sepoys deployed but could not
advance across the open ground ahead of them.
A further complication was that untrained African porters had been
dragooned into carrying the Rajputs’ own machine guns and ammunition, and on
the commencement of German fire the porters rapidly shed their loads and
returned to the beach.
On hearing the heavy firing ahead Brigadier
Tighe left one company of Pioneers to secure the beachhead and advanced with
the remaining half of the Rajputs battalion and three companies of
Pioneers. On reaching the firing line
the four Rajput companies were deployed to extend the line to the left. Lieutenant Colonel H.W. Codrington,
commanding the Rajputs, climbed a small knoll with his Adjutant to view the
battlefield. Another officer ran up the
knoll to deliver a message and was seen by the enemy. German machine guns raked the knoll, severely
wounding Codrington and mortally wounding the other two officers. This incident shook the Rajput sepoys, and it
was quickly followed by the death of a company commander, Major B.A. Corbett. Captain R.H. Waller, Staff Captain, was also
killed whilst delivering a message.
Brigadier Tighe then put the three Pioneer
companies into the line on the left of the Rajputs; the advance of these sepoys
was hindered by dense vegetation and a consequent lack of visibility. The leading Pioneer officer, Captain B.E.A.
Manson, led a rush on an enemy machine gun but he and all the men with him were
killed. A second Pioneer charge was
beaten back with heavy losses. At this
time enemy reinforcements from Moshi began appearing on the battlefield; they
halted at a railway station out of sight of HMS
Fox’s guns and rapidly marched towards the battle, commencing an attack on
the British left flank.
The German Askari attacked sounding horns
and bugles, pushing the exhausted Pioneers and Rajputs back towards the Red
House where the sepoys rallied and a British defensive line was established
again. During this retirement Subadar
Bakhtawar Singh of the Rajputs was severely wounded in the leg but he continued
to rally his men and cover the withdrawal; he was later awarded the Indian
Order of Merit, 2nd Class.
The
British reverse was halted by the appearance of two newly-landed companies of
Pioneers who stood their ground and stopped the German attack. Brigadier Tighe was by now as shaken as his
sepoys were, and he reported to General Aitken that his two battalions were
unreliable and that four more battalions should be landed before the advance
was resumed. Out of 1,100 men on the
battlefield the IS Brigade had lost 140 sepoys and 9 British officers.
Two men of the IS Brigade Signals Section
had displayed great courage during the German attack, standing their ground
from time to time during the withdrawal and shooting down several enemy
Askari. Captain E.D. Carr-Harris, Royal
Engineers, was killed in action but Private N. Lobb survived and was awarded a
Distinguished Conduct Medal.
Meanwhile on the German side the local
commander, Baumstark, felt outnumbered and withdrew outside the town to the
west and awaited further reinforcements.
General Aitken landed at this time but neither he nor Brigadier Tighe
ordered a reconnaissance to be made into Tanga town, which was empty of
defenders except for a few scouts. This
situation was changed later that night when von Lettow arrived from Moshi and
ordered the re-occupation of the town defences; sadly the British were too
involved with licking their wounds and landing more men and they missed the
chance to quickly occupy an undefended Tanga.
The
advance onTanga
on 4th November
Disembarkation of the remaining infantry
units continued throughout the night of 3rd-4th November
and into the morning; Beaches ‘B’ and ‘C’ were used. The mountain battery was left afloat, tasked
with firing from the deck of its transport as General Aitken considered the
bush to be too thick for effective use of artillery on land. None of the sapper units were disembarked,
nor was the gun detachment from the North Western Railway Volunteers. The 63rd Palamcottah sepoys had a
very bad night, being loaded into lighters at 2300 hours then stood down and
re-loaded onto their transport until dawn when they got back into their
lighters. After all the sepoys were
ashore Aitken disembarked his large number of Followers and porters; this was a
mistake because as soon as the fighting started these non-combatants panicked
and clogged-up the beach heads.
General Aitken, seemingly unaware of the
carnage that enemy machine guns might cause, mounted a traditional type of
attack on Tanga at noon, after the sepoys had breakfasted. In the centre of his extended line was the 2nd
Loyal North Lancashires (North Lancs) tasked with controlling the direction of
the attack; to its left was the 63rd Palamcottahs and on the left
flank was the 101st Grenadiers.
The 98th Infantry was in left reserve. To the right of the North Lancs were the 3rd
and then the 2nd Kashmir Rifles with the 13th Rajputs in right
reserve, and in the rear the 61st Pioneers was the Force reserve. The Gwalior Infantry was tasked with beach
protection.
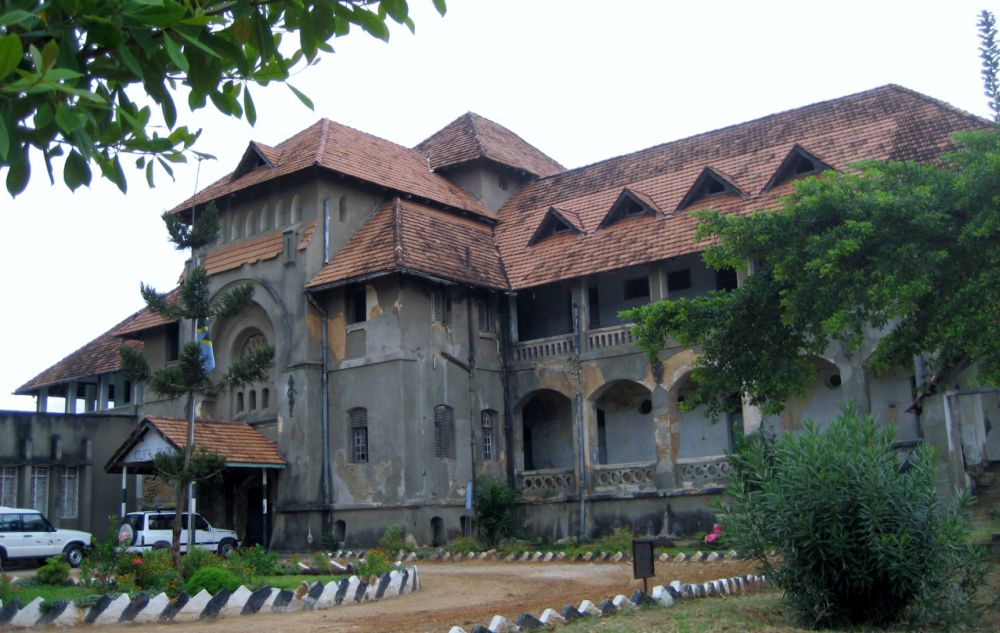
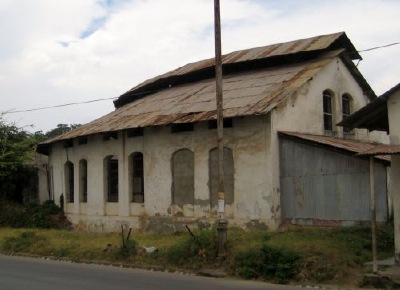
Right: The Railway Workshops
The British line advanced under a very hot
sun through rubber and sisal plantations, but the Germans had not been idle and
stay-behind snipers engaged the line causing troops in the rear to fire upon
their own comrades further forward. By
1400 hours many men had consumed the water they were carrying and were thirsty. Gaps were opening in the line as the Kashmiris
inclined towards the harbour shore; in turn the North Lancs inclined right, the
exhausted Palamcottahs began to straggle and the 101st Grenadiers
became isolated on the left. The
Grenadiers were advancing directly towards a German strongpoint as the concrete
railway workshops ahead of them housed several machine guns.
On reaching the railway cutting the
defensive fire increased heavily, and whilst the Kashmiris and North Lancs engaged
the enemy and skirmished forward the Palamcottahs broke and ran to the
rear. The North Lancs machine guns were
well handled and suppressed the fire of the German machine guns. Lieutenant Colonel C.E.A. Jourdain,
commanding the North Lancs, requested that the 98th Infantry move
forward to support him, but the sepoys of that battalion refused to advance
although some men of the draft from their linked battalion, the 83rd
Wallajahbad Light Infantry, under Lieutenant W.G. Proctor, showed courage and
advanced to the cutting where most of them were killed. On the left the Grenadiers were moving well
but were receiving heavy fire and were totally unsupported.
At this point in the battle rifle and
machine gun fire broke open a number of African wooden beehives suspended from
trees, and the bees violently attacked both sides, rendering some men
unconscious with the ferocity of their stings.
Sub-Conductor W. Preston of the Indian Telegraph Department continued
taking a message whilst being attacked by bees and afterwards over 300 stings
were removed from his head; he later received a Distiguished Conduct
Medal.
But the North Lancs, the Kashmiris (who
wrapped puggarees round their heads as an anti-bee measure) and many of the 13th
Rajputs crossed the cutting and entered the eastern side of the town where
heavy house-to-house fighting ensued.
The Kaiser Hotel was reached and Captain Seymour of the Rajputs got onto
the roof and hauled down two German flags.
Naik Girdhari Singh and Sepoy Daulat Singh of the Rajputs later received
Indian Distinguished Service Medals for recovering Captain Seymour after he had
been shot. At one point Captain Seymour
fainted and was thought to be dead but he was revived by bee stings.
The Kashmir Rifles fought in the town with
gusto and Subadar Randhir Singh, 2nd Battalion, was awarded an
Indian Order of Merit, 2nd Class, for charging and capturing a
German machine gun. Lieutenant Colonel
Durga Singh, 3rd Battalion, later received an Indian Order of Merit,
1st Class, for conspicuous courage and leadership despite receiving
two head wounds.
In the thick scrub on the left flank the
Grenadiers came up against four enemy Field Companies and despite charging
valiantly the battalion could not progress.
By then half of the forward Grenadier companies and all the British
officers in them were casualties. When a
German counter-attack was mounted the surviving Grenadiers were compelled to
fight an independent withdrawal action. Many
individual acts of bravery were observed such as that of Sepoy Fazal Khan who
received an Indian Order of Merit, 2nd Class, for attempting to
prevent the death of the Adjutant, Lieutenant R.P. Hughes. Sepoy Sabdal Khan went forward to recover his
wounded Jemadar and for that act of gallantry he was later awarded an Indian
Distinguished Conduct Medal.
The mountain battery did not have forward observation
officers accompanying the infantry, nor did the Royal Navy. General Aitken had not wanted the naval guns
to fire onto Tanga town as he required the buildings to be left intact for his
use, but at around 1600 hours he changed his mind. But both the mountain and the naval gunners
could only fire blindly towards the sounds of the actions and their fire
sometimes hit the positions of their own infantry.
Colonel Jourdain had not crossed the
cutting with his battalion and he remained near to General Aitken, perhaps at
the General’s request. By 1700 hours
German counter-attacks with fresh troops were being mounted in the town against
the North Lancs and Kashmiris, and the North Lancs companies became concerned
about the withdrawal of the Grenadiers on their left flank which could be
monitored by the sound of the firing.
The North Lancs company commanders, apart from one whose company was
pinned down in view of the railway workshops, held a council-of-war and decided
to withdraw back across the railway cutting.
This manoeuvre was made in conjunction with the Kashmiris but the North
Lancs lost many men in the railway cutting who were hit by the enemy machine
guns in the railway workshops.
A new shortened British defensive line was
established east of the cutting and when a German counter-attack was put in from
the railway workshops against the North Lancs left flank, the steady fire of
the North Lancs riflemen, supported by the machine guns of the 61st
Pioneers, defeated the attack. At that
point the Royal Navy was requested to heavily shell the town, which it did,
causing considerable structural damage, but the Germans had withdrawn to
regroup at the western end.
As the sun set the British line was
defended on the left and left centre by the North Lancs, the remnants of the
101st Grenadiers and some of the 98th Infantry; on the right and
right centre the Kashmiris held firm with groups of 13th Rajputs and
61st Pioneers intermingled amongst them. Many of these men, especially the North Lancs
and the Kashmiris, were determined to fight on and had no thought of quitting,
however behind them on the beaches were demoralised rabbles of frightened,
panicking sepoys, Followers and porters who had fled the battlefield, and whose
fear infected the support troops and beach staff.
Above: The German Hospital
The
withdrawal from Tanga on 5th November
During the evening of 4th
November General Aitken expressed his intention of mounting a bayonet attack on
Tanga town during the night as there was a full moon, but his Brigadiers did
not support it. Tighe continued to
believe that the Rajputs and Pioneers were too shaken to fight aggressively (4),
Wapshare could not get over the behaviour of the Palamcottahs and the 98th
which had led to the decimation of the gallant Grenadiers, and Malleson was not
controlling the beachheads effectively because of the growing mass of demoralised
and malingering sepoys there who would not return to the battlefield. The North Lancs and the Kashmiris were
regarded as sound but they had suffered many casualties (5). After deciding that staying where the Force
was on the Ras Kasone headland could not be contemplated because of a lack of
water and reinforcements, Aitken ordered an evacuation by sea. Meanwhile the diversionary operation mounted
by IEF ‘C’ near Moshi had absolutely no effect on the Tanga landings as the
Germans continued to send men down the railway line to Tanga without hindrance.
No plan existed for an evacuation from
Tanga as that event had not been envisaged, but the Royal Navy produced one. The navy insisted on day-time activity, only
‘A’ Beach to be used, and the abandoning of any weapon or piece of equipment
larger than a rifle so that boats would not be damaged (despite the fact that
boats had not been damaged during the initial landings). IEF ‘B’ formed a perimeter line and spent a
jittery night waiting for the dawn. Once
again there was no British attempt at reconnaissance into Tanga town; if that
had happened Aitken would have learned that once again the Germans had pulled
out of the town for the night and were awaiting more reinforcements that were
coming down the railway line from Moshi.
As soon as the tide allowed on the 5th
November the Followers and porters were re-embarked followed by the sepoy
battalions, the last of which were the Kashmiris. The North Lancs formed the final cordon
around the beach head and then embarked in good order; the Germans had been
unaware of what was happening and did not interfere apart from shelling one of
the transports that caught fire and left the harbour.
The 2nd Loyal North Lancashires
had been the backbone of IEF ‘B’ during the Tanga operation and later 10 men of
the battalion were awarded the Distinguished Conduct Medal for gallant acts
such as bringing machine guns abandoned by other British units back into
action, rallying sepoy stragglers and fighting bravely in the town against
German counter attacks.
The Red House at ‘A’ Beach had been used as
a British hospital and by agreement with the Germans when they re-occupied Ras
Kanone headland the Quartermaster of 2LNL, Lieutenant R.L. Rowley, took a party
of his soldiers in lighters and recovered 74 of the wounded, 49 being left
behind because they could not be moved (6).
Other British wounded were left in the care of the staff of the German
hospital located east of the port.
Also left behind were 10 machine guns,
several hundred rifles, tons of ammunition, tents, kit bags, medical panniers,
signals equipment, rations and cooking utensils (7). The abandoning of weapons and ammunition was
bitterly resented by the units that still wanted to fight and the North Lancs
sea-dumped its ammunition and the machine gun breech blocks; however the German
railway workshops in Dar Es Salaam fabricated new blocks and had 8 of the guns
back in action very quickly. Colonel von
Lettow-Vorbeck had not only won a battle against superior odds but his
adversaries had departed gifting him weapons, ammunition and equipment that
considerably enhanced his Schutztruppe expansion programme.
Conclusion
IEF ‘B’ sailed to Mombasa (8) where it was
amalgamated with IEF ‘C’ and used for the defence of British East Africa and
Uganda. The Tanga debacle was covered up
and General Aitken was returned to Britain.
Blame was unfairly placed on the shoulders of the sepoy battalions instead
of on the lack of tactical ability, man-management and nerve of the senior
commanders. It was decided that as a
mark of official displeasure British officers were not to be considered for
gallantry awards.
Promoted
to the 1st Class. This
gallant officer, who was suffering from fever at the time, was conspicuous for
his courageous behaviour in leading his men on the 4th November 1914
at Tanga. He was shot across the face
and again through the back of the head.
2.
Indian Order of Merit, 2nd Class
a.
Subadar Bakhtawar Singh,
13th Rajputs.
For gallant
behaviour in the action at Tanga on the 3rd November 1914. Although severely wounded, he continued to
rally his men and to cover the retirement.
b.
No. 1222 Sepoy Fazil Khan, 101st
Grenadiers.
For gallant
behaviour in the action at Tanga on the 3rd November 1914. He remained with Lieutenant Hughes, the
Adjutant of his regiment, and two other men until they were all killed. He refused to leave Lieutenant Hughes until
he was assured that this officer was dead and then he brought away the latter’s
sword with him.
c.
Subadar
Randhir Singh, 2nd Kashmir Rifles.
For his gallant behaviour
in the action at Tanga on the 4th November 1914, when in command of a
detachment which charged and secured the enemy’s trenches and captured a
machine gun. In leading his men, he was
severely wounded.
3.
Indian
Distinguished Service Medal
a.
No. 1870 Naik (then Sepoy)
Girdhari Singh, 13th Rajputs.
b.
No. 1566 Sepoy Daulat
Singh, 13th Rajputs.
c.
No. 905 Sepoy Sabdal Khan,
101st Grenadiers.
4.
Distinguished Conduct Medal
a.
Sub-Conductor W. Preston, Indian Telegraph
Department.
For gallant conduct
on 4th November, 1914, during the attack at Tanga (East Africa), and for
general good work performed under heavy
fire.
b.
No. 1073 Private N. Lobb, No. 31 (Divisonal)
Signal Company,
Sappers and Miners (ex-1st Battalion Durham
Light Infantry).
For conspicuous
gallantry under heavy fire on 3rd and 4th November, 1914, at Tanga (East
Africa), when he was largely instrumental through his courage and determination
inchecking the
enemy's advance.
c.
No. 8966 Lance Corporal W. Wylde, 2nd
Battalion the Loyal North Lancashire Regiment.
For gallant conduct under heavy fire in rallying parties of men on
several occasions during the action at Tanga (East Africa) on 04 Nov 14, &
thereby checking the enemy’s counter-attack d.
No. 10033 Private A. Allan; No. 10073 Private
C. Arnull; No. 7035 Private T. Boyle; No. 8541 Private J. Cunningham; No. 9499
Private M. Lawlor; No. 9732 Private J. Ridgeway; No. 9141 Private T. Smith; No.
9877 Lance Corporal W. Taylor; No. 10351 Private R. Woodward; all of the 2nd
Battalion The Loyal North Lancashire Regiment.
For gallant conduct on 04 Nov 1914 during the attack at Tanga (East Africa)
& for general good work performed under heavy fire.
Zeile 2
ANNEX
2 CASUALTY
FIGURES FOR THE TANGA OPERATION
1.
Killed or Died of wounds.
British officers 20
British soldiers 26
Indian officers 11
Indian sepoys 302 Total: 359
2.
Wounded.
British officers 16
British soldiers 62
Indian officers 16
Indian sepoys 216 Total: 310
3.
Missing.
British officers 3
Indian officers 2
Soldiers & sepoys 143 Total: 148
GRAND
TOTAL: 817
Twenty two British soldiers were missing, all
of them being taken prisoner, 18 of them being wounded.
Of the sepoys missing the Germans
subsequently reported taking 56 of them prisoner, 30 being wounded.
The 101st Grenadiers lost 6
British officers, 6 Indian officers and 172 sepoys killed, and 38 all ranks
wounded and missing.
Details of the numbers of casualties
amongst the British Followers and porters are not available.
The British and Indian dead were buried in
ditches by the Germans near where they fell.
The Germans lost 16 Europeans and 55 Askari
Killed, and 24 Europeans and 52 Askari wounded.
One European was taken prisoner.
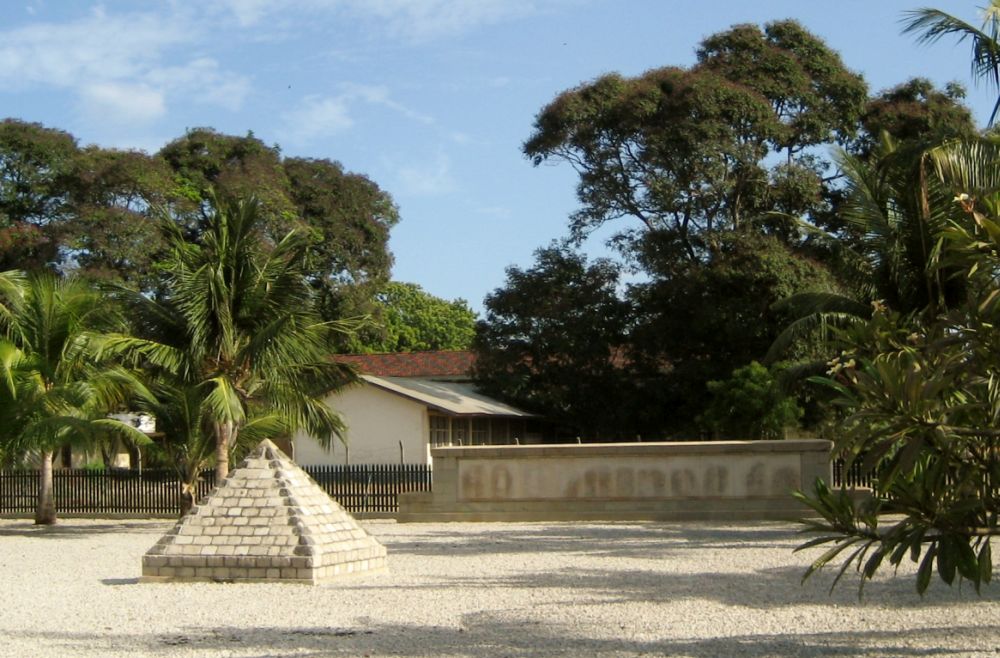
Commemoration
As was the custom at that time, upon the British
capture of Tanga in 1916 the British and Indian units involved in the 1914
battle subscribed to a memorial which was a small stone pyramid. It lay where the 101st Grenadiers
had fought fiercely and many human remains were found nearby. In later years the Commonwealth War Graves
Commission erected a wall behind the pyramid and attached name panels to it.
ENDNOTE
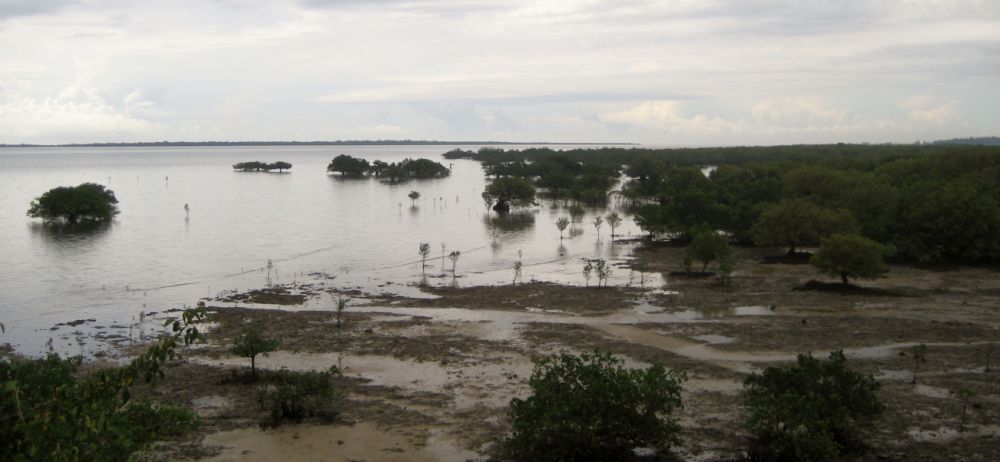
Very little has changed on the Tanga
battlefield during the last 102 years.
The railway cutting and workshops and the German Hospital are untouched
and the three beaches are easily located.
A new structure occupies the location of the Red House. If any reader has an opportunity to visit
Tanga then a walk or drive around the battlefield is strongly recommended.
Footnotes 1) Only the 2nd Loyal North Lancashires, 61st
KGO Pioneers and the 101st Grenadiers had been armed with machine guns prior to
1914.
2) Some units had in fact boarded their
transports a week or more in advance of sailing.
3) Ishmael, a Ugandan, was the only
officer in the force with personal knowledge of Tanga.
4) Tighe was perhaps being
over-pessimistic as well-commanded sub-units of both the Rajputs and the
Pioneers had operated effectively that day, despite some of their comrades
sloping off to the rear. The constant
drifting to the rear of leaderless men affected all units and at one stage an
officer of the 61st Pioneers had to grip around 30 demoralised men
from the North Lancs and make them pull themselves together. 5) British casualty figures for the
Tanga operation are listed in Annex 2. 6) This incident was falsely described
by Colonel R. Meinertzhagen on page 101 of his book Army Diary as “a lighter full of half-naked men of the North Lancs
came inshore from a transport and commenced to bathe”. The men were in fact swimming to push the
lighter on-shore as the navy boat that had towed it towards the beach had cast
off and departed. Sadly Meinertzhagen’s
account of his experiences as an intelligence officer during the Great War East
African campaign is constantly flawed by falsehoods and exaggerations. This subject is fully explored in Brian
Garfield’s book The Meinertzhagen
Mystery. The Life and Legend
of a Colossal Fraud. 7) Also abandoned were the wine stocks
of the 2LNL officers’ mess, and correspondence about reimbursement for this
loss went on throughout the years of the Great War. 8) At Kilindini Harbour, Mombasa, the
BEA customs authorities attempted to levy duty on the stores and equipment
being unloaded by the North Lancs. A
squad with fixed bayonets was marched to the customs shed where the customs
authorities were encouraged to be more understanding about the war.
SOURCES:
·
Ross Anderson. The Battle of Tanga 1914. (Softback
2002, Tempus Publishing). ·
Rana Chhina. The Indian Distinguished Service Medal.
(2001, InvictaIndia). ·
Ann Crichton-Harris. Seventeen Letters to Tatham. A WWI Surgeon
in East Africa. (Softback, 2002, Kennegy West, Toronto). ·
Peter Duckers. Reward of Valour. The Indian Order of Merit,
1914-1918. (1999, Jade Publishing Limited). ·
Charles Hordern
(compiler). History of the Great War.
Military Operations East Africa, Volume I, August 1914-September 1916.
(Reprint 1990, The Battery Press, Nashville). ·
General Paul Von
Lettow-Vorbeck. My
Reminiscences of East Africa. (Reprint by Battery
Press, Nashville). ·
Colonel R. Meinertzhagen. Army Diary, 1899-1926. (1960, Oliver and
Boyd). ·
Charles Miller. Battle for the Bundu. The First World War in
East Africa. (1974, Purnell Book Services Ltd). ·
Edward Paice. Tip & Run. The Untold Tragedy of the
Great War in East Africa. (2007, Weidenfeld & Nicholson). ·
Colonel H.C. Wylly. The Loyal North Lancashire Regiment
1914-1919. (Softback, Reprint 2007, The Naval & Military Press Ltd). ·
War Diaries: War Diaries:
2nd Loyal North
Lancashires (WO95 5339/2); 13th Rajputs
(WO95 5318); 98th Infantry (WO
95 5333); 101st Grenadiers
(WO95 5369). ·
Correspondence in the
National Archives and Imperial War Museum from officers who had been at Tanga
serving in the 2nd Loyal North Lancashire and the 61st
King George’s Own Pioneers. ·
Articles on the battle
available in the National Archives and Imperial War Museum and others taken
from Naval and Regimental journals, the Tanganyika Notes and Records journal, and
German sources. ·
London Gazette award
announcements.


 Right: The Railway Workshops